Prepare for Halloween with a NEW Look for your Blaster

Hey Blasters- we’re sure that you’re starting to get excited for trick or treating on Halloween night, right? Well, you can get in the spirit a little early with MathBlaster! Using the avatar builder, you can make your Cadet seriously spooky- no masks or facepaint needed! We redesigned a few of our favorite Blasters to see how ghoulish it could get. Here’s the before from one of our male Space Cadets…

MB Boy Before

Does your Blaster look something like this? While this is a pretty cool-looking Cadet, it could look a bit more …monstrous, don’t you think? Click “more” to see our redesign!

Continue reading

Make Your Pod Out-of-This-World Cool!

Hey Blasters! How much time do you spend in your Pod? It’s where your Blaster goes to relax after intergalactic adventures and spend time with your Mutt, so it should feel like home! We recently redesigned one of our Blaster’s pods… Check out the transformation below!

MB BeforeBefore… This is probably a lot what your pod looks like. Cool, but could be better, right?

MB After

After… We spent some hard-earned credits decking out our pod with our favorite colors and new items! Remember, you can increase your earning potential around the space station by simply playing our learning games! Want to learn how we managed this out -of-this-world restyling? Keep reading…

Continue reading

Red Alert: Your Help is Needed!

Depending on your rank in the I.S.P., you might already know all about what to do when a Red Alert occurs. However, for some of our newer recruits, these Space Station moments might leave you frazzled. Have you been on board when the red lights flicker and Mission Control calls all Blasters to their stations? This is YOUR chance to shine, because the Intergalactic Space Station is under attack and needs your help!

Continue reading

Show the Ooze Who’s Boss

To be a skilled Intergalactic Space Station Blaster, every Cadet must fine tune their problem solving efforts on top of quick reflexes. Oozami is the perfect training course to put your math skills and response times to the ultimate test! Climb to the top unscathed as you race against time to answer math problems that will unlock the chamber doors to freedom and away from the toxic ooze! Here are some tips and tricks that will help you conquer the obstacles in Oozami!

Escape the ooze - The most important thing to remember while training in Oozami is to never touch the ooze! So be careful as you jump from one platform to another in your search for the correct answers.

Click here for more Oozami Tips and Tricks!

DIY Space Ship!

Cardboard crafts are genius and so much fun! The materials are budget friendly and they create hours of entertainment in both creating and playing—especially if it is large enough to climb into. So, instead of tossing out the huge refrigerator box from your latest kitchen appliance purchase, bring the final frontier to your living room with these tips on how to build a DIY cardboard space ship that you and your Blaster can enjoy!

SpaceAdventureInspiration

What you’ll need for this project is simple—cardboard boxes or one huge refrigerator box, some duct tape or packing tape, a pair of scissors, paint, and a kid’s imagination!

Start off by helping your Cadet sketch out what they think their space ship could look like, especially they gadgets inside. This way you can incorporate all of your kid’s ideas to make the sketch come to life! Then gather all of your tools and materials and start creating, getting your kids involved with as much of the process as possible.

To make this cardboard vessel more interactive, place bottle caps or corks for “buttons, switches, and knobs” on the inside instead of just painting or drawing them on. To keep your little ones busy for longer, you can create astronaut costumes that they can wear while playing.

After you are done, your Cadet will be so proud to know that they had a hand in making this fun new toy themselves! Help your Blaster equip their newly built space craft with blankets for comfort along with snacks and water to replenish their energy for hours of

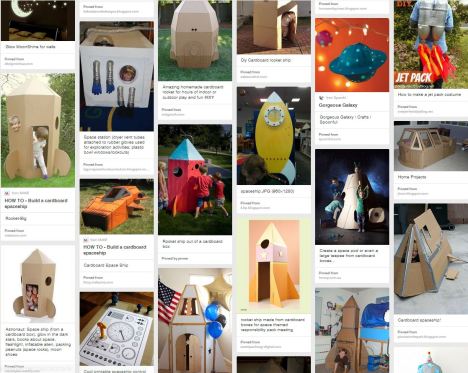
out-of-this-world fun! Visit our Pinterest page for inspiration on how you can transform your home into an amazing indoor space adventure, starting with spaceship made of cardboard!

My Pod: Your Home Aboard the Space Station

Every Blaster needs a break from working to save the I.S.P. and your Math Blaster Pod is the perfect place for a peaceful retreat. Here, Blasters can throw their own Pod parties to celebrate their accomplishments, invite over their in-game B.F.F.s, or just relax and decorate their humble abode. For some tips and tricks to mastering this area of the Space Station, here is a video on what to expect while in My Pod!

Make it your own - A Blaster’s Pod is their home away from home and can be customized with all the things that make a Cadet calm, cool and ready for adventure! While you’re settling in, you can fulfill one of GC’s Missions and grab new furniture from the My Pod Store or rearrange existing furnishings for a brand new feel! With all the options for beds, tables, seating, and lighting or gadgets, Cadets can personalize their Pods to make it truly their own!

Seeing Stars - Your Blaster can track their Star Status on their very own chart located in their Pod. You can collect more Stars by helping out fellow Cadets in caring for their Monster Mutts or by visiting other Blaster’s Pods and ranking them!

A change in scenery - Is your Blaster enjoying their view of space from their Pod? Perhaps you would rather relax in a Pod underwater. Whichever it may be, Cadets can change their Pod Location to suit their mood. Grab different Locations off the My Pod Store to switch through sceneries!

Click here to learn more about your Pod!

Build Your Own Planet

What is a simply DIY craft project that you and your space-crazed kid can complete together? Try making this easy, mess-free solar system to hang in your Blaster’s room!

Materials

The materials you need to complete this galactic task are as follow:

  • Color paper
  • Scissors
  • Compass or several circular objects (mugs, bowls, plates, etc.)
  • Pencil
  • Fishing line
  • Stapler
  • Glue
  • Star-shaped stickers (optional)

StackedStapledFishing Line

Steps:

  1. To create our hometown, Earth, you will need blue, green, brown, and white colored paper.
  2. To be precise, you can set your compass’ width to be 7 cm, which means the diameter of your circles will be 14 cm in total. Or you can use a large mug instead, and trace the outline onto the colored paper by using your pencil.
  3. Using your scissors, cut out the circles. Then, fold them in half.
  4. As shown in the image, stack the paper and staple across the crease that you just folded to keep the paper intact
  5. Then, fold the paper backwards to create a 3-dimensional shape.
  6. Tie the fishing line around the center seem.
  7. Tie a knot and your Earth is completed!
  8. Optional: You can purchase star-shaped stickers and use it as a label for the planet and to cover up the knot you tied in step 7.
  9. Repeat steps 1 to 8 to create Saturn, but this time, use orange, yellow, brown, and white colored paper instead, and set your compass’ width to 10 cm, or find a bigger circular object.
  10. To create the ring, simply create two circles in white and brown respectively that are just a tiny bit smaller than the ones you did to create the spherical shape of Saturn.
  11. Glue them together by slightly overlapping them, and slide it over the 3D Saturn.
  12. Repeat steps 1 to 8 to create the other planets, but make sure you alter the measurement of your compass slightly to show the scale between the different planets.

Complete

Note:

  • The more circles you cut out, the more detailed your planets will look, but it will also be harder to staple all the paper together.
  • Assist your kid when using the compass – the sharp tip can be hazardous.
Follow

Get every new post delivered to your Inbox.

Join 155 other followers